The 4th and tasty frozen treats

With the Fourth of July a couple days away I’ve been reminiscing on what we’ve done in past years on that festive day. The couple of times that we’ve stayed in town we’ve done a little tradition that someone could probably write a country song about- we drove out to an open field parked the truck, put the tailgate down and ate some ice cream as we watched the firework show- the more mainstream version of what we’ve also done is we’ve found a patch of grass and laid out a blanket and brought out the glow sticks, snow cones and also enjoyed the light show.

No matter where we will be this year, we will definitely be in Arizona where the temperatures will be in the 100’s (degrees Fahrenheit) …even at 8:30pm when the fireworks usually start…So a cold treat is perfect for that night.

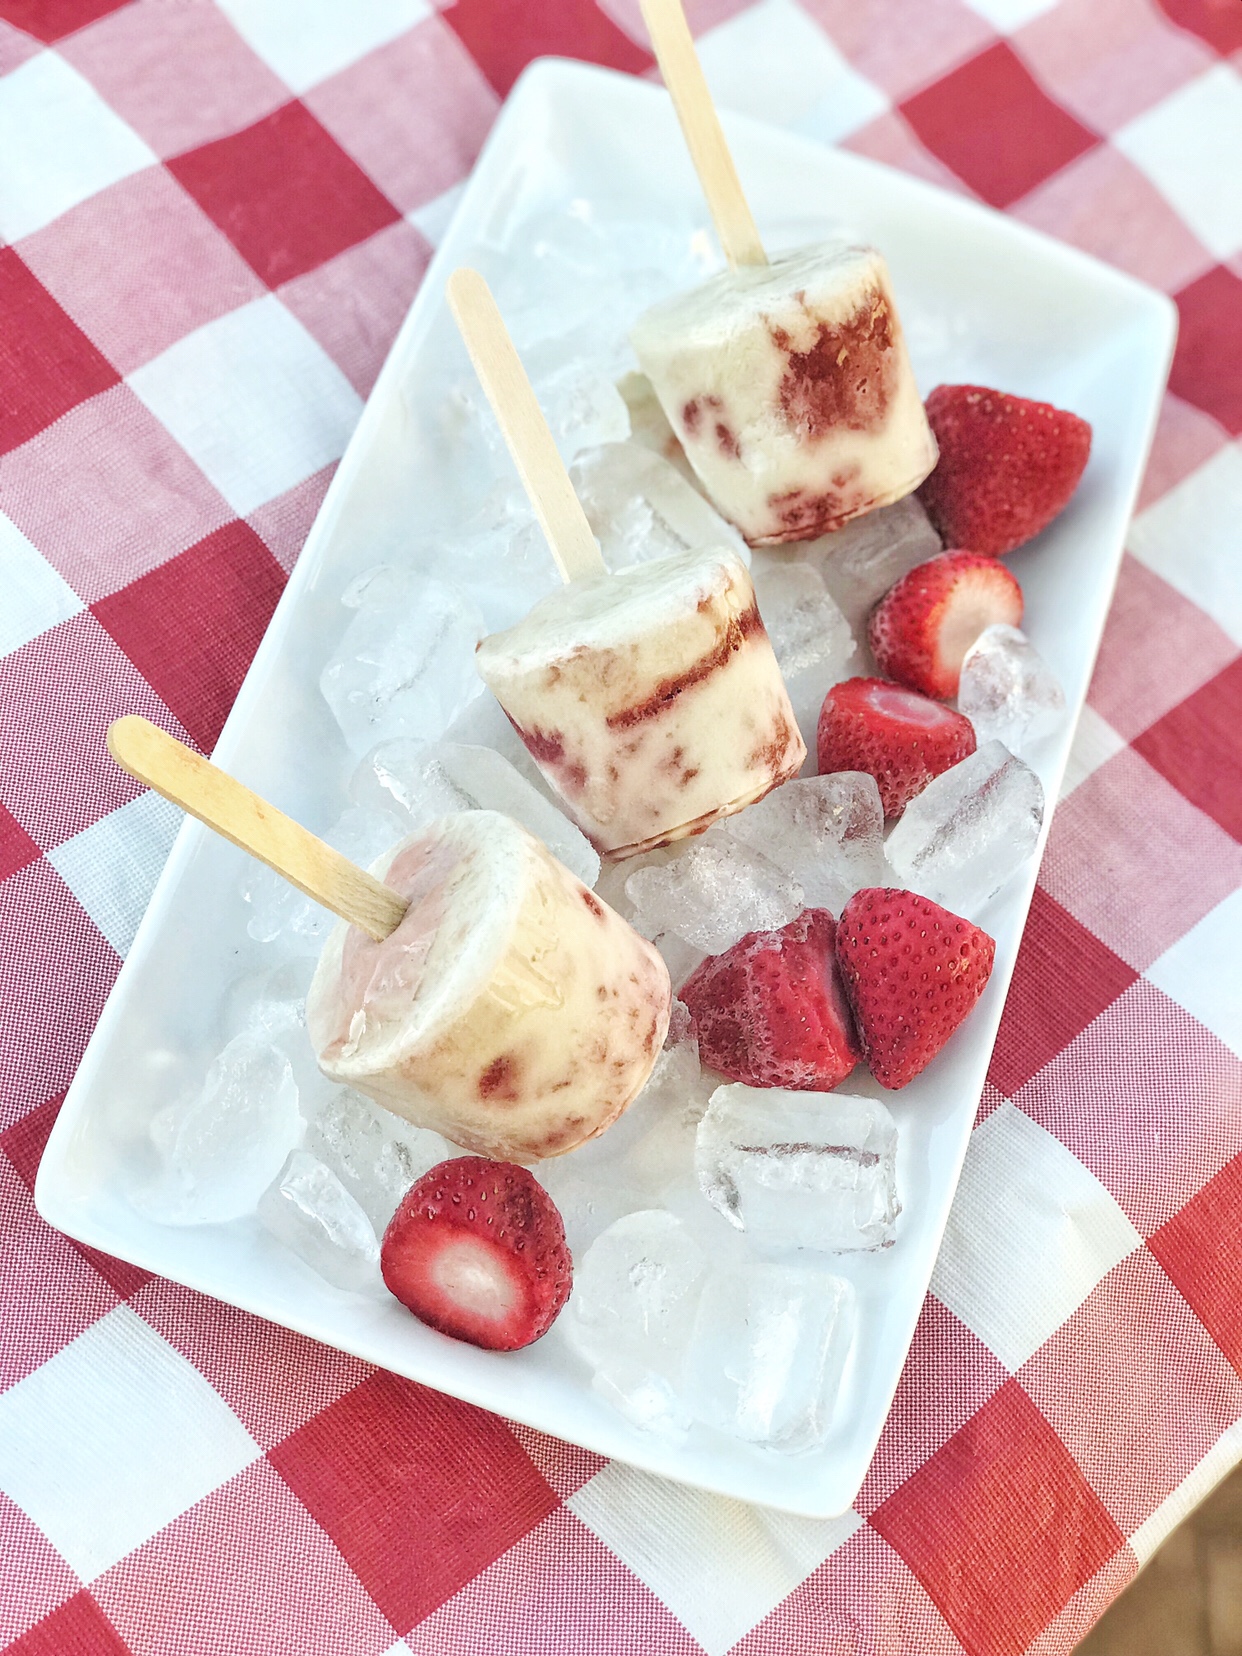
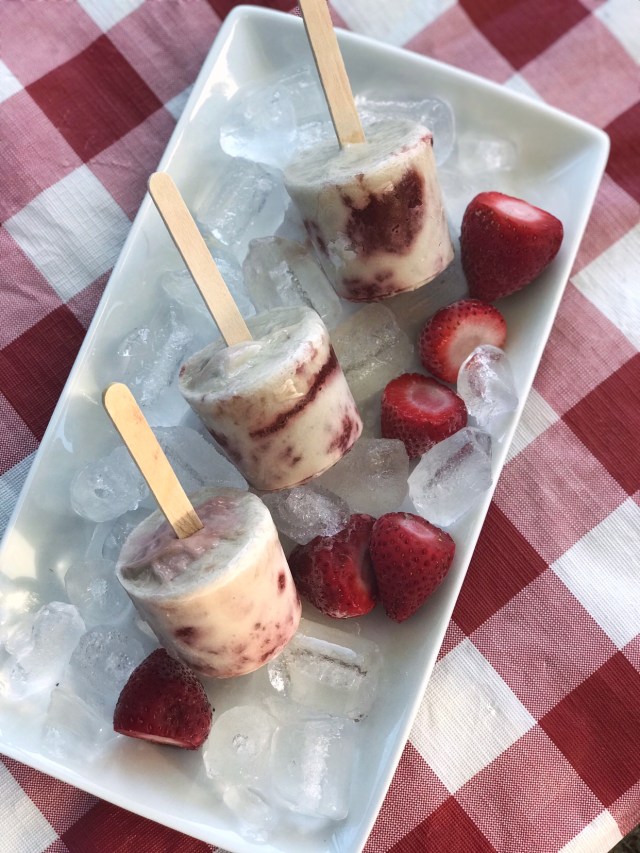
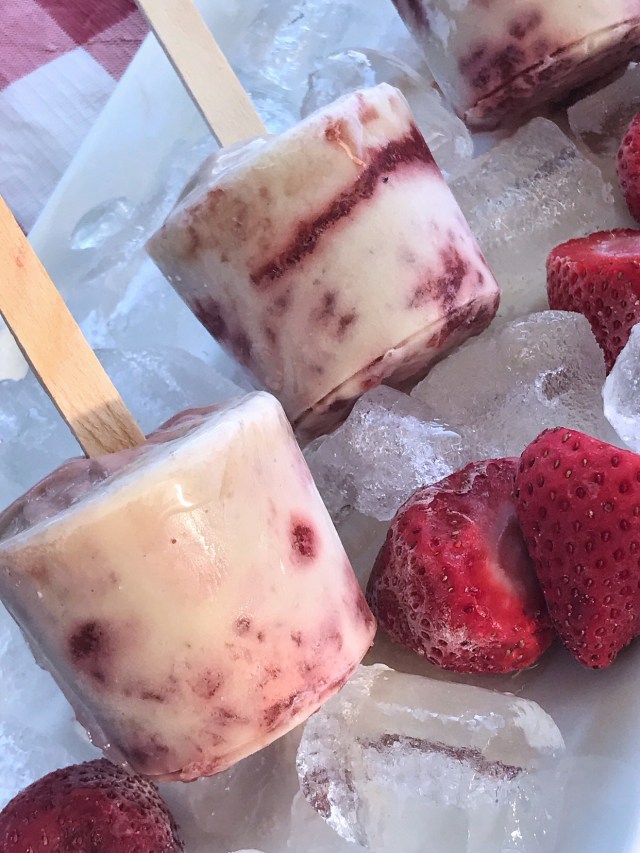
I have a fridge full of strawberries, so I was inspired to make a recipe for strawberry marbled like popsicles. I wanted to make sure the recipe turned out popsicles that weren’t super icy or tasted too watery. I think I succeeded.

I cooked down the strawberries into a jam like consistency which made these popsicles soft and rich when you get to the strawberry parts. The coconut parts are a little creamier than you would expect because I used coconut milk from a can, so they are not as icy than if I would’ve used coconut milk from a carton from the refrigerated section of the grocery store.

The popsicles are sweetened with coconut sugar. Coconut sugar is a better alternative to refined white sugar even though it has the same amount of calories because it contains minerals and amino acids and is also low glycemic. An added bonus is that coconut sugar is paleo making the ingredients in these popsicles vegan, paleo, dairy free, and gluten free, so if you adhere to any of these dietary restrictions you can eat these!

They are delicious and we approve and loved them!! My little, almost two year old, one devoured them and the hubby also enjoyed a couple.

I invite you to make them and judge for yourself. Let me know what you think!

Vegan and Paleo Strawberry Coconut Popsicles

Ingredients

  • 2 heaping cups of strawberries
  • 1 Can of Organic unsweetened coconut milk light (I used Native Forest brand and didn’t notice it wasn’t whole or full fat coconut milk, which you can use to yield creamier pops)
  • 2 1/2 tablespoons coconut sugar (to add to strawberries)
  • 2 tablespoons of coconut sugar (to whisk into coconut milk)
  • Popsicle molds or six 9oz clear smooth plastic cups, popsicle sticks and foil

Directions

  1. In a saucepan over medium heat add strawberries, a splash of lemon juice and 2 1/2 tablespoons of coconut sugar. Cook for 5 minutes stirring constantly to make sure mixture doesn’t burn.
  2. Then take a fork and mash strawberries and continue to stir and cook for about 5 more minutes or till mixture become jam like. When this is achieved remove from heat, set aside and allow to cool to room temperature.
  3. Open Can of coconut milk and pour into a small mixing bowl. Add remaining 2 tablespoons of coconut sugar and whisk together till thoroughly combined.
  4. Once strawberry mixture has cooled take a spoonful of the mixture (use a standard spoon you eat with) and add to the bottom of each of the 6 cups. Very gently use a ladle and pour a little coconut milk over the strawberry mixture in each cup. Place cups in the freezer for about 20 min. Remove from freezer and add little globs of the strawberry mixture down the sides. Then gently ladle more milk over the mixture. Freeze for another 20min. If after this step you have more mixture and milk left, repeat…add a little bit of strawberry mixture and milk, but this time cover with foil and add popsicle stick. The goal is to fill cups, at the most, to halfway. The foil helps the sticks stay in place and keeps the popsicles covered. Place cups back in freezer for at least 6 hours.

Side note: you can also combine the strawberry mixture with the coconut milk and pour mixture into cups or molds for an easier popsicle that still tastes great.

Spicy chili

This is the recipe for the chili I made for the fall picnic date I previously posted about. See here.Chili is one of those dishes I start to make once October rolls around. It’s a very seasonal dish at our home, but once it’s that time of year we really enjoy it more than a few times.

I think this dish is a great compromise dish that includes what my meat eating husband loves and what I love as the legume and veggie lover. Plus we also both really enjoy spicy foods, so I warn you this chili is spicier than other recipes. I sometimes make this recipe with ground turkey-this time I went all out for Jimmy haha and made it with organic grass fed ground beef.

Once the chili is ready, We love to top it with crumbled corn bread, sour cream, shredded cheese to tone down the spicy…but then I add diced red onions and even extra diced jalapeños. It’s such a hearty meal and so easy.

This particular recipe is too spicy for my kids- when I make it I get extra cans of the tri-blend organic beans, and they enjoy a bowl of beans topped with cheese and a side of cornbread so they feel like they are joining in the dinner festivities.

If you make it, please let me know what you think.

Spicy Chili Recipe

Ingredients

  • 2tbsp olive oil
  • 1.34 lbs organic grass fed ground beef (this is a strange exact amount only because I bought the Costco brand and that’s how it comes packaged, but a package of 20oz is what you would look for)
  • 1 medium yellow onion diced
  • 3 cloves of garlic minced
  • 1 red bell pepper seeded and diced
  • Half a 4oz can of diced jalapeños (save the rest for topping)
  • 1 (15oz) can tomato sauce
  • 1 (14.5oz) can diced tomatoes
  • 2 cans (15oz each) organic tri-bean blend (contains kidney, pinto and black beans)
  • 1 1/2 cups broth (I have used water instead when I am out of broth and it still turned out good but broth is recommended)

Spices

  • 3tbsp chili powder
  • 1tsp paprika
  • 1/2 tsp cayenne pepper
  • 1 1/2 tsp cummin
  • 1tsp crushed dried oregano
  • Salt and pepper

Directions

  1. Add 1 tbsp olive oil to a large pot over medium high heat. Add onion and red bell pepper and sauté for 5 min stirring frequently.
  2. Add in garlic and all the spices and toast them for 1 min stirring everything around continuously.
  3. Move everything to one side of the pot add the other tbsp of olive oil.
  4. Add in the beef and season it with some cracked black pepper and salt.Cook the beef till any pink disappears breaking it up and combining it with onions and peppers.
  5. Once beef is cooked add in tomato sauce, diced tomatoes, beans and broth combine everything. Add another pinch of salt. Turn up heat and bring to a boil once it starts boiling reduce to a simmer and cover. Let the chili simmer for at least 45 min the longer it cooks the better.

Fall picnic date in your own backyard

Our first picnic together was also our first Valentine’s Day together. It was 7days after Jimmy asked me to be his girlfriend. That first picnic was simple. I didn’t really have time to help with the planning. I had homework for my post bachelors teaching certification that I finished right before Jimmy picked me up. Plus he wanted to be sweet and take care of the date. We stopped by Eegee’s (it’s a local thing) for some sandwiches and frozen fruit type drinks on our way to a beautiful and my favorite park in Tucson,AZ. Ever since that first picnic date February 14th, 2010, picnics have been something the hubby and I love doing together. We enjoy the fresh air, good food, good conversation and each other’s company.

Along with all of you I’ve been inspired by the colors, tastes and what should be the feels of fall. I wanted to do something intentional to make it feel like fall around here. We don’t get the changing fall leaves or the crisp air, so I planned a fall picnic date in our own backyard. I was on a mission to bring the senses of fall to us.

Jimmy loves chili which alongside cornbread in this case gluten-free cornbread is the perfect fall meal. I made a pot of extra spicy grass fed organic beef and organic three bean chili- I prepared toppings of grated cheese, sour cream, diced red onion and diced jalapeños.

I wanted it to be all those fall colors browns, oranges, and burgundies. I styled the picnic by layering two blankets first a burgundy one and then a plaid one over. I added some lanterns and some flowers from a bush in our backyard. I love incorporating greenery from my surroundings whenever I do a little layout like this. Stay tuned the spicy chili recipe will be posted soon!

Why I need to spend more time outside and you should too!

Three days have gone by and the sun has not touched my skin if not filtered through the glass of the windows of our home. The last time I got direct sunshine I was walking from my house to the car then from the car to the grocery store. Sounds alarming right?!

This is what M-F week may be like for me (we usually try to do family things outside of the house on the weekend). During the week, especially in the dreaded hot summers of Phoenix, AZ, the kiddos and I are indoors caught doing whatever we can till it’s rational to be outdoors again. If you’re a stay at home mom that still doesn’t have school aged kids and are also a homebody, you may be able to relate…but, We should make more of an effort to spend time outdoors because going outside can be helpful for your overall health and that of your kiddos! There are scientifically proven benefits outlined in many scientific studies and simplified in many online articles for spending some time in nature.

Spending dedicated time outside can have some wellness advantages like:

  • …improve your brain concentration, short term memory and help your mental fatigue. According to a study from the University of Michigan, being out in nature (even your neighborhood park) increased concentration of participants by 20%, as opposed to those spending their outdoor time in a city scape. In a different study, children’s concentration and focus who have ADHD improved after spending time outdoors compared to kids who have ADHD and spent their time indoors doing the same activities.

  • …help raise your vitamin D levels. One of the ways our bodies make vitamin D is it uses UV rays to kick start the process of turning the ingredients already in your body, used for the production of vitamin D, to usable vitamin D. Good vitamin D levels are necessary for calcium absorption and a strong immune system.

  • …decrease stress levels and anxiety. It’s not completely understood exactly how spending time in nature lowers stress and anxiety, but it has been noted that taking in the sights and scents of nature can lower your heart rate and make you feel more serene.

Now that you know and the season has shifted it’s a perfect time to take advantage and make a plan to go outside daily. If we are purposeful in scheduling our time out of the house for outdoor activities, we won’t be caught in a rut of indoor activity with the kids and the ongoing list of chores.

Here are some ideas of what I will be implementing during the week to help me get out. Please feel free to use these suggestions.

  • Go on a run/walk at least three times a week- you can do this early in the morning by yourself before your hubby goes to work. This is a wonderful way to start your day and have quiet time…or you can put your kids in a wagon or stroller for a walk or jogging stroller for a run.
  • Take the kids to the neighborhood park once a day- I plan to do it after breakfast on the days we don’t have errands to run. It doesn’t have to be for hours. 30-45 min should suffice.
  • Plan a family picnic once a week- when you put the word picnic in the mix it already sounds tedious, but it doesn’t have to be. Seriously pack whatever you normally make or buy for Lunch (even something as simple as PB&J) and a blanket and go sit in the grass somewhere. You can also cook dinner normally and opt to eat as a family in the backyard.
  • Spend time in our backyard. This one is pretty straight forward but with technology and all we have going on we forget that it’s perfectly ok to just let the kids play outside!

I feel like these are pretty simple and inexpensive ways to spend time outdoors. Do you have any other suggestions? I’d love to hear them 🙂

Sources:

Apples for breakfast

I’ve been inspired by apples lately. It’s apple season, and I love seeing all the pictures of fellow mommies on Instagram taking their families apple picking. I want to take my family, but we haven’t gone yet… I got apple on the brain. They seem to be on sale at every grocery store too. There are so many delicious things you can make with apples…delicious baked apples, apple pie and apple crisp come to mind. When I think of using apple it’s always in these ways, making some kind of tasty dessert (all which can be modified to be healthier not using refined sugar and even gluten free), yet I want more practical ways to incorporate apples everyday…Especially if I am going to go apple picking, I want to have a plan for the fruits of our labor.

My son Jameson has become obsessed with eating apple slices dipped in peanut butter! He’s been eating two apples a day! So that’s one option. I’ve mentioned in previous posts on here and Instagram how much we love oatmeal especially once fall rolls around. I made this oatmeal this week and got great reviews from the hubby. It’s a warm bowl of creamy oatmeal with diced apple, raisins and sprinkled with cinnamon. So delicious, simple and filling. Read on for the recipe.

Apple Cinnamon Oatmeal

  • 1 cup of oats (I used gluten free oats from Trader Joe’s)
  • 2.5 cups of water (I use extra water cooking oatmeal usually calls for 2 cups of liquid for every cup)
  • 2 tablespoons peanut butter
  • 2 tablespoons honey
  • 1 large apple (We used a gala apple)
  • 1/4 cup raisins
  • Cinnamon
  1. Cook oatmeal according to cooking instructions.
  2. While the oatmeal cooks, you have about 10 minutes) core apple and dice it into tiny pieces (Approximately 1/2 an inch)
  3. Once it’s cooked keep it on lowest setting on stove and stir in peanut butter and honey. The peanut butter will make it creamy.
  4. Remove oatmeal from heat stir in apples and raisins.
  5. Serve and sprinkle with cinnamon according to preference.

Side note: This makes two big bowls of oatmeal. We get 4 small bowl servings for all of us since it is filling. This oatmeal is rich and thick. Once it’s served you can pour in any kind of milk (I would add almond milk) to make it a little thinner.